Welcome to my first Last Days: Zombie
Apocalypse battle report and my first battle report in a very, very
long time. Hopefully I remember how to do this...
Forces:
For this game, I ended up picking my
HassleFree minis “closely resemble but are legally distinct”
Scooby Doo group. Originally released by in 2012 (if I remember
correctly), these are the “post apocalyptic” versions they made.
Sadly, I wasn't able to get the Scooby mini and ended up with the
minigun version of Daphne. I also really want to track down a Mystery
Machine...
Ahem. The forces. Due to the rules, I
ended up making a Selfish force, as follows-
Fred (tough guy, neutral) armed with
semi-auto pistol and a heavy blade
Daphne (survivalist, selfish) armed
with a SAW and a knife.
Velma (leader, selfish) armed with a
chainsaw and magnum pistol.
Scary Doo (dog, neutral)
Shaggy (tough guy, neutral) armed with
a pump-action shotgun and a heavy club
Their Refuge is a Mall. Since I don't
have to worry about competing against another player, I can spend all
my Scavenge Points on Perks and just have some fun.
Mission -
Set-Up/Terrain:
As per the rules laid out in the book,
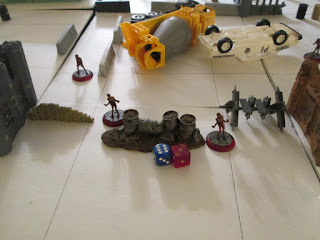
I used a few vehicles to create a group of car wrecks in the middle
of a crossroads, using some cars and trucks I've picked up. I then
put down some ruins, barricades, barrels, and some other bits. I
didn't use any difficult terrain because I didn't want to have one
more thing I'd forget while playing. And I felt like I had more than
enough terrain on the table.
After that, I set up five zombies in
the middle of the board (using some Torn from SpineSpur so I could
tell them apart from the ones that would be spawning). After that, I
set up my own survivors, splitting up the group just like they do in
the old show. Fred and Daphne to one side; Velma, Shaggy, and “Scary
Doo” off to the other. I didn't want to have too much distance
between the two groups, but I also knew that it was better to make
sure that one wouldn't be sending zombies after the other.
The last part of the set up was the
other group of zombies. When you're playing solo, you place zombies
equal to the level of the group you're playing. so you're going to be
dealing with more and more as the campaign advances. That's going to
be fun... Not. These zombies replace the other player's group in
missions.
The Game:
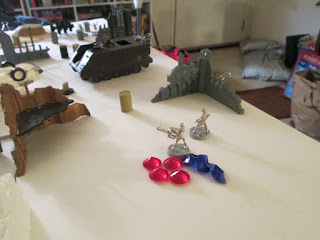
The first turn was pretty mellow, the
zombies advanced towards the survivors. I was a little worried that
I'd get swamped right away, but I far enough back to have the
distance I needed. I then moved my forces forward, getting Scary up
front and engaged. That was the whole point of him. He could move
ahead of everyone else and doesn't suffer from a penalty when engaged
by a group. Since most of the group was lugging several pieces of
Heavy gear, I had to be careful. I made sure to position everyone
else carefully, so they could open up on different zombies.
Which is what they did. While my dice
were good most of the game, they weren't doing great at the start. I
got in some hits and took out one or two. Those dropped the Supply
Tokens I needed. I sent out Shaggy and Fred to grab them, as Velma
was already moving slowly and Scary couldn't. That was fine, it
allowed me to keep them mobile and have them cover the ones with the
Tokens.
After the second turn saw a few more
zombies pop up on my rear. Between the Chainsaw and SAW, plus having
Scary Doo, I was generating a few Noise Tokens. Since the closest
board edge was behind me, that meant that I ended up with quite the
little group coming up from the rear. However, I was able to clear
off the zombies I had started with without too much trouble. I did
have to shuffle the Tokens around, to keep things moving.
As the game went on, Scary was always
in the fray. Since dogs don't take penalties for taking on multiple
enemies, I kept him moving towards every fight he could. Velma kept
getting caught in combat because of how slow she was moving. While
she was able to cut down zombies with ease, she would have another
one jump into a fight. Daphne had something of a similar problem. The
SAW was great at cutting down zombies from a distance but was
generating just enough zombies to hamper the other half of the team.
I also had to make sure that Shaggy and Fred opened fire first, as
Selfish models target the zombie closest to them, so I could work on
thinning the ranks. Scary was really the MVP of this game. When I
would get a group of zombies built up, he was always there. Sure, he
didn't have the greatest CQC stat nor did he have a bonus to the Lobo
rolls but I'll be damned if he didn't take down more than anyone
else. It's a shame I can't level him up because he deserves it. Fred
did alright, mostly doing cover for Daphne and hauling around a
Supply Token. Shaggy was also good at moving and recovering things.
And, when he was in combat, he used his axe very effectively.
I was really lucky with the End Phase
events rolls. Only twice did have a car alarm go off and had one
Supply Token get back up as a zombie. I did stop rolling it during
the last two turns because I was getting a little frustrated and
wanted to get on with my night! Besides, I knew that was soon as I
was about to finish, I'd get something really bad...
As things started to wind down, I only
had two zombies left. One was about to be surrounded by Velma,
Shaggy, and Scary; and the other would have easily been gunned down
by Fred and Daphne. So, I called the game there. I also said that I
eliminated all of the zombies and got to collect all of the Supply
Tokens. Hey, my board, my rules. I only had to fudge one other roll,
because it wasn't quite cocked but I needed anything besides the 1 I
rolled.
What I learned from playing this game:
Oh boy, there were a lot of missed
rules and things I read incorrectly the first time. And I made
several mistakes at first. I had the zombies with Supply Tokens
moving at full speed at first, which was mixed. It meant that I
didn't have to work as hard to get them. I also messed up and thought
they were Heavy 1, not Heavy 2. I also had Shaggy hauling two them
around for a while. Oops. I also couldn't find the rule about car
alarms (page numbers are really nice, people) so I just said it was
like a Noise Maker item, since I could find that easily.
That's one thing I can't stress enough:
This book needs to be cleaned up, badly. You have to jump from page
to page to page to find the cost, stats, and then special rules for
equipment and models and etc. There's also a huge problem with things
having several different names in different parts of the books. I'm
already working on reference sheets I'm going to type up and print
out.
The Post Game Results:
When everything was said and done, I
made out like a bandit. Everyone that could gained a level. I got
some okay rolls for my loot. I did end up with three Hunting Rifles.
I didn't get the minigun (it'll happen, I know it will).
I didn't have to modify my rolls too
much when it came to leveling everyone up. I had Velma roll on the
Characteristics table, as I really want to get her some AP, but she
got another point of CQC. Which is absolutely fine. I had everyone
else roll of skill tables. Shaggy got Heavy Lifter, which gave me a
chuckle. Daphne got Quick Load, which was another thing that was
pretty good. And Fred got Gear Head. So... Yeah, the dice really
loved me this time around. Maybe it was the blessing of Scooby Doo? I
don't know.
Since I ended up with a good stash of
Scavenge Points, I had Fred build a Fenced-Off Garden, so I could get
some more Salvage Points as the game advanced. I had everyone else go
on Guard duty so I didn't have to worry about a Zombie Attack. Well,
also most everyone... Since I had enough points, I decided that the
Gang needed someone to help carry things and kill zombies. Who? Well,
you'll have to find out next time!


No comments:
Post a Comment